Nokia Router 3.1 Guide
Understanding your router is the key to a great broadband connection. Here you’ll find support for everything, from setting up the router to fixing any issues that arise.
I need help with...
Your router anatomy
Find out exactly how to push my buttons
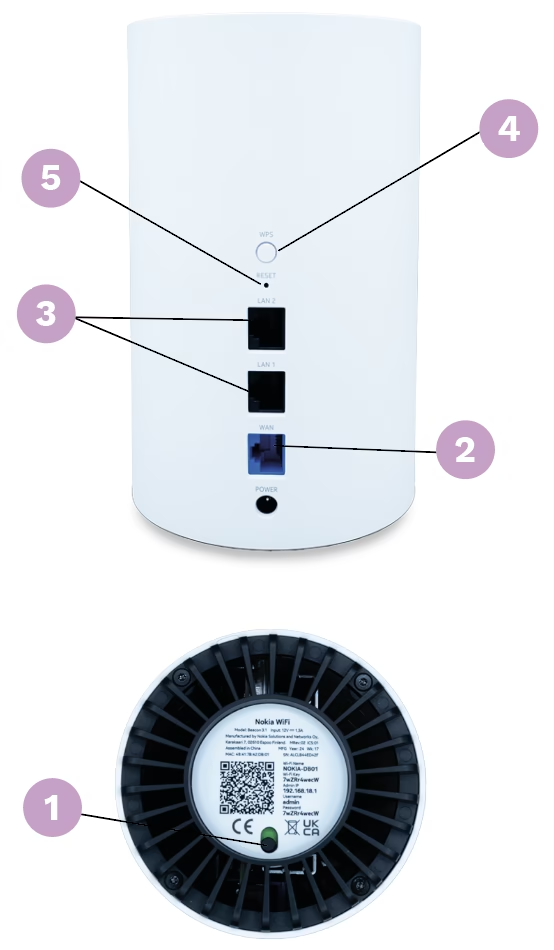
1. Power
Make sure this is pushed to green by sliding the button.
2. WAN Port
An ethernet cable should be plugged into this and the other end of the cable should be plugged into your Optical Network Terminal or ONT (the box on the wall).
3. LAN Ports
You can use these to plug your devices directly into the router, instead of connecting via WiFi.
5. WPS Button
When connecting certain devices like Sky boxes or printers you can press the WPS button on the router and on your device. Using this means you won’t have to enter a password.
6. Reset Button
Please DON’T press the reset button unless our team has told you to do so.

How to pair devices using the WPS button
Step 1
Press the WPS button on your router for a few seconds, you will notice the router start to flash.
Step 2
Then press the WPS button on the device you want to connect (if it has one).
Step 3
Your devices will attempt to pair during this time, once the device has finished its pairing cycle this will stop flashing and will return to its original state.
Step 4
If this feature does not work, please use the SSID and password to link the devices.
Setting up
Using the power adapter provided plug this into the power port on the back panel of your router and to the wall socket.
Make sure the on/off switch is set to on.
A light should appear on the front of your router as it’s powering up. It will take a few minutes to boot
up and start working.
You’ll then be able to connect to the WiFi with your devices.
Using credentials printed on the bottom of the router: the default name of the network is the “SSID” and the default password to connect to it is the ten digit “WiFi Key”.
Nokia WiFi App
As a security measure, the Nokia WiFi App will only work whilst your mobile phone is connected to your Nokia home WiFi network, so please make sure you are connected before trying to use it.
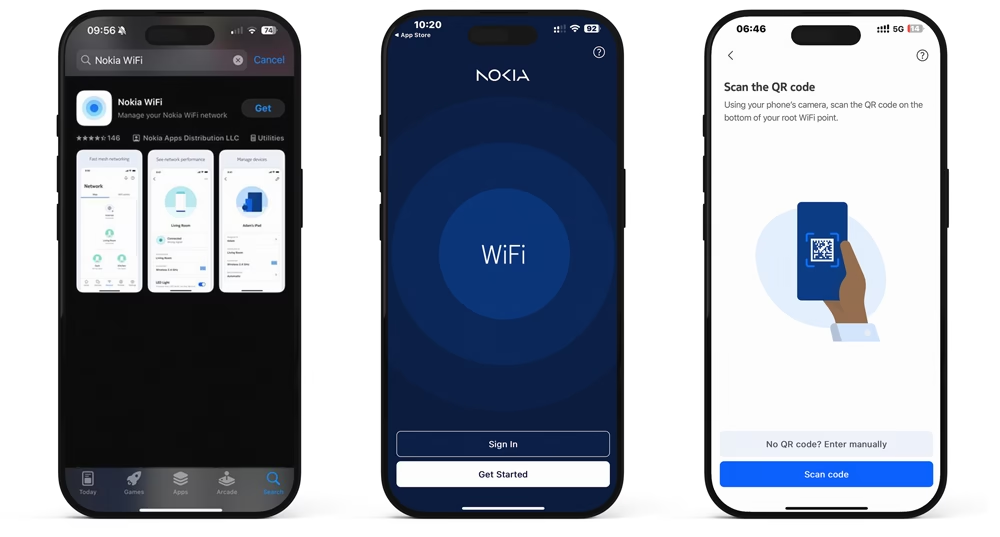

Step 1: Connect your smartphone to your new home WiFi network
Open the WiFi settings on your smartphone and connect to the WiFi network with the WiFi name and password printed on the bottom of your router.

Step 2: Download the
Nokia WiFi app
To download the app on an
iPhone or Android device, open
the Apple App Store or Google Play Store and type “Nokia WiFi” into the search bar at the top of the screen.
Once you’ve downloaded the app, open it and you’ll be greeted with a welcome screen. Simply, tap Get Started.

Step 3: Enter the details
On the next screen, you’ll be prompted to scan the QR code located on the bottom of your router.
If your smart phone cannot scan the QR code, then you can manually input the details printed on the bottom of the router next to the QR code. To do this, select the No QR code? Enter manually option.
The Nokia WiFi app makes it easy for you to
You can rename WiFi points, set your SSID (network name), change passwords and create a guest WiFi network.
You can give your family, friends and visitors temporary access to the internet whilst preventing access to your other connected devices like your smart TV and smart heating thermostat.
You can set bedtimes and pause the internet for individual devices and people whilst allowing unrestricted access for everyone else.
You can improve the WiFi coverage throughout your home by connecting additional Nokia Beacons to create a Mesh WiFi network. These can be purchased from us for a small monthly fee. Find out more about WiFi Boosters here.
You can see the signal strength for each device connected to your WiFi network and check for any issues in real-time.
Your router lights
The lights on the front of your router show you the status of your broadband service.
This table shows the LED colour, behaviour, explains what it means and what to do.
Common FAQs
Still can’t find what you’re looking for? Find answers to some of the most commonly asked questions
This is most likely a problem with the router or ONT in your home. To fix this, try the following:
Step 1: Make sure your ONT is working.
Make sure that the lights labelled 10GE, Optical, and Power are lit in green. If any of these LEDs are red, please call us on 0800 0699906
Step 2: Make sure that your router is switched on.
On a Nokia Beacon 3.1, the single LED light on the front of the device should display a steady Blue.
Step 3: Check the cables.
Check that the ethernet cable connecting your ONT to your router is firmly connected to the blue WAN port on the router and is not loose at either end.
Make sure the power cables are properly plugged into the power ports of both the ONT and the router.
Step 4: Make sure you’re using the WiFi credentials (SSID and password) shown in the app or, if you’re certain they’ve not been changed, printed on the bottom of your router.
You can only use the Nokia WiFi app when you are connected to your Nokia WiFi network.
Step 1: Make sure your smart phone is connected to the Nokia WiFi network.
Step 2: Close the Nokia WiFi App fully on your smartphone and reopen it.
WiFi signals are blocked by dense materials like wood, metal, brick and stone. They can also suffer from interference from other WiFi networks, microwave ovens and other radio equipment.
Step 1: Try moving your router or additional mesh Beacons.
Make sure your router and additional mesh Beacons aren’t in any cupboards or behind any furniture or metal objects.
If you have a mesh solution, try moving your mesh Beacons closer to the main router or to another Beacon that has a strong connection. The closer they are the better they work, and they should be no more than two rooms apart. If possible, avoid placing the Beacon on the other side of dense objects like load-bearing walls, metal objects, or appliances like microwaves, as they can interfere with the signal.
Step 2: Consider ordering additional Beacons (WiFi Boosters) to create or improve your mesh WiFi network.
As an existing customer simply call 0800 0699906 to add to your package.
There could be a problem with the device you are trying to use, the router or ONT in your home or in the Wildanet network.
Step 1: Check to see if any other devices connect to the internet. If they can, then the problem will be with the device you’re trying to use – try switching it off and on again and then get help from whoever provided the device to you.
Step 2: Check the Customer Hub to see if we have any know network outages.
Step 3: If the issue persists, call us on 0800 0699906
Step 1: Find the password in the Nokia App.
Open the Nokia WiFi app. Tap on the blue WiFi name card, which displays your current SSID, then click on the blue card to reveal your WiFi password.
Step 2: Try the default password.
If you don’t have access to the app and are struggling to connect your device to the internet, and you think you haven’t changed any passwords on your router, try using the default WiFi Password printed at the bottom of your router (note you need to check the sticker on the main router plugged into your ONT, not one of your mesh Beacons).
Step 1: To change your WiFi password, open the Nokia WiFi app and select the WiFi name card at the top of the screen. You can find the desired SSID by swiping left on the name card, then tap the desired WiFi name card to reveal its password.
Step 2: Once opened, tap the Edit button at the bottom of your name card.
Step 3: Once opened, tap the pencil icon at the top of your screen. A warning will appear, informing you that the connection will be down for 5 minutes. Tap Continue to proceed.
Step 4: On the next screen, you can then change the name of your WiFi and reset the password. Once a new SSID or password is added, tap the pencil icon at the top of your screen to confirm.
WiFi Coverage Explained

Small Home: Council House, Single-floor Flat or Small Bungalow
If you live in a 1–2 bedroom small bungalow or single-floor flat with your broadband router in a central spot and 1 mesh WiFi Booster is usually all you’ll need.
Typical household:
- 1–2 people
- Streaming TV, browsing, smart speakers, and a few connected devices
Your Wildanet package:
100 Mbps – great for streaming, browsing, video calls
200Mbps or more if your broadband usage is heavier
Recommended setup:
1 WiFi Booster — one connected to your router to extend coverage to the furthest room.
Why it works:
You’ll get full-speed WiFi in every room, even if your bungalow’s walls are thick or your router’s at one end of the house.
Medium Home: 2up-2Down
If you live in a two-storey house (two rooms upstairs, two downstairs), WiFi often struggles to reach the upper floor evenly.
Typical household:
- 2–4 people
- Multiple TVs, phones, laptops, gaming consoles, smart home devices
Your Wildanet package:
350Mbps to 500Mbps or more if your household streams, games, works from home
Recommended setup:
Up to 2 WiFi Boosters — one by the router downstairs or mid-way through the home (like the stairs or hallway), and one upstairs.
Why it works:
This setup creates a seamless WiFi blanket across both floors.
Large Home: Georgian 3-Floor House or Detached 4+ bedrooms
If you live in a large, 3-storey period home with thick walls or long corridors, WiFi signals can fade before reaching top or basement levels.
Typical household:
- 4–6+ people
- Heavy broadband use — Multiple 4K streams, online gaming, smart security systems, and home offices
Your Wildanet package:
500Mbps, 1Gig, or even 2Gig for heavy users, many devices, offices, streaming 4K everywhere
Recommended setup:
Up to 3-4 WiFi Boosters — one connected to your router, and the others spread evenly across each floor for full coverage.
Why it works:
The mesh system keeps your speeds consistent from the kitchen to the annex — no more buffering, dropouts or WiFi dead zones.